Quantcast
Channel: The Imagination Tree
Viewing all 168 articles
Browse latest View live

Salt Dough Handprint Christmas Tree Ornaments

$
0
0
Create some cute handprint Christmas tree ornaments using green sparkly salt dough and paints! These are lovely as a little keepsake and memento of how the kids have grown. I do love handprint keepsakes!
 To create these christmas tree handprints from salt dough I thought we would try to colour the dough before cooking for a change. We have made blue and green stars and christmas tree ornaments in the past and knew that salt dough does take colour really well before drying. Click here to read our full instructions for making salt dough and simply add green colouring and a large sprinkling of green glitter at the kneading stage. Simple!

Once the dough was coloured, kneaded and glitter added, i rolled it out and formed it into flat circles. The girls each placed their hands in the middle and I poked two holes at the top of each one, using a straw. The holes are vital for being able to thread twine through and hang them up afterwards. They went into the oven at about 100 degrees C (around 200 F) for 2-3 hours. When they were cool I painted inside the handprint with a darker shade of green paint (just ordinary washable paint) then left them to dry again. 
When dry I set them out as little invitations to create, using gold and red paints, cotton buds and fabric stars to decorate them as trees.They dipped the ends of the cotton buds into paint and carefully dabbed bauble shapes over the trees. Then they stuck the fabric stars to the top using self-adhesive glue dots (but any type of strong glue would work.) Pop decorated Baby Bean's for her and did a lovely job of it!

Then we threaded some red and white twine through the holes, wrote their names and ages on the back with a permanent pen and now they are hanging up in our home! These would also make such a sweet gift for grandparents.

Love handprint ideas? See more here:

  This activity is good for:
  • Sensory: messy and tactile exploration
  • Motor skills: kneading/ squishing/ rolling/ flattening/ poking/ squeezing/ treading
  • Maths: weighing quantities/ counting/ capacity (full, empty)
  • PHSE: working independently
  • Creativity: painting/ modelling/ sculpting

    New here? Welcome!
     Sign up to receive every post in your inbox!
Enter your email address:

Delivered by FeedBurner


Dinosaur Small World Play in a Suitcase

$
0
0
Create a dinosaur small world play scene in a suitcase for playing on the go! Perfect for long journeys, staying with grandparents, keeping small toys organised by theme and as a simple yet beautiful homemade gift!
If you follow this blog you will already know that I am in love with these gorgeous paper mache suitcases I found via an ebay shop recently and have begun to create a series of small world, imaginative play scenes with them. The first box was an arctic small world scene with polar bears and sensory pay elements which is wrapped up ready for Christmas already.
This next small world scene is a dinosaur landscape, ready for my 4 year old nephew as one of his Christmas presents! He absolutely loves dinosaurs in all shapes and sizes and making him a small world to store all his little toys in and carry along with him when he goes out seems a perfect match for him!

To create this box I simply painted the inside of the lid with blue ready-mix paint to represent the sky. Inside the base I painted green and added a little mountain to form part of the backdrop. You could get really creative and make any kind of landscape you can imagine! When the paint was dry I added white clouds to the sky and outlined them with blue glitter glue to make them sparkly.
Into the box I added:
a set of small pay dinosaurs
large pebbles
green pom poms
pine pines
spiky grass cut from green felt

I will also add a dinosaur story book to complete the gift!

The loose elements are important for fostering imaginative play and open-end creativity. There is a set limit on what can be done when all the materials are glued into place or simply painted into the scene. The girls have already had a little play with this box (road-testing it for quality control purposes of course!) and it has the big thumbs up! They rearranged the sensory materials, told little stories and took the dinosaurs on journeys.

As with the Arctic play box, I didn't paint the outside but you could do of course. This time I simply personalised it for him so everyone will know it's his special box (keep away big brothers!)

If you make one of these I would LOVE to see a picture or hear about your ideas in the comments or on my Facebook page. I respectfully ask other bloggers not to post about this idea on your own blog until I have finished my own series (these boxes are very special to me!) Thanks so much.


     Sign up to receive play ideas straight to your inbox
    Enter your email address:

    Delivered by FeedBurner

10 Christmas Ornaments Kids can Make [It's Playtime!]

$
0
0
Here is a collection of simple ideas for quick, easy and sentimental Christmas ornaments you can make with your kids this week! These were linked up through It's Playtime and use a wide range of media with lots of different Christmas themes. Check out the links to each one! 

[Clockwise:]
Ice Ornaments [Red Ted Art]
White Clay Ornaments [The Imagination Tree]
Filled Glass Ornaments [Happy Hooligans]
Santa Mouse Walnut Ornament [Mom on Time Out]
Snowman Paper Roll Ornament [Life With Moore Babies]
Bead Threaded Ornaments [Preschool Powol Blog]
Photo Ornament [Raise a Boy] 
Hama Bead Ornaments [Mummy, Mummy, Mum!]


Were you featured today? Grab a badge!


It's Playtime is a collaborative linky hosted by: Anna  at The Imagination Tree, Rachel and Holly at Quirky MommaJamie @ hands on : as we growRachele @ Messy Kids and Jenny @ Let the Children PlayWe're all about PLAY!


Have you got a playful or creative activity to link up? We'd love to see it!


By linking up you are giving us permission to feature your post with one photo on a future featured post, thanks!

Edible Peanut Butter Play Dough Recipe

$
0
0
Here's an easy recipe for edible peanut butter play dough, that is gluten free and can be baked into simple, tasty treats too. A fun and quirky spin on the classic play dough recipes which tastes great!
As you know by now we absolutely love to make play dough in our home! I have written about the incredible developmental benefits of playing with play dough and have a whole page dedicated to the dozens of recipes we have tested out so far. But one recipe I'd seen around and not yet tried was for peanut butter play dough. Each recipe that I read was different so in the end we experimented and came up with our own, which is one of the most fun parts of play-recipe making; becoming home scientists!
Peanut Butter Play Dough Recipe:
1 cup powdered milk 
1/3 to 1/2 cup peanut butter (crunchy for added texture or smooth)
1 teaspoon honey

Mix all the ingredients together in a bowl and add more powdered milk if the dough remains too sticky to touch. Then simply roll it out, cut shapes and play! The lovely thing about this recipe is that it is completely edible so safe for little ones who are still at the tasting stage. Obviously do not use this with children who have a nut allergy or are too young to eat nuts. 

After a little bit of playing we thought we would experiment by seeing if the dough could be cooked, and it can! 
 We rolled them into balls (great for fine motor skills), pushed them into some oats and baked them for about 10 minutes at 180 degrees Celcius on an oven tray. They were delicious with a glass of milk, though only one or two at a time as they were fairly salty!

This play dough is, essentially, just normal cooking dough, but still lots of fun. I probably wouldn't put it in our favourites list but I'm glad we tried it as we had it bookmarked as a must-try for a long time!

A few of our favourite play dough recipes:
Best Ever 4 Minute Play Dough Recipe
The Very Hungry Caterpillar Play Dough
Willy Wonka Play Dough
Chocolate Play Dough
Lavender Play Dough

What they are learning as they play:


  • Sensory: exploring textures using fingers and scents using nose. Describe sticky/ dry/ liquid/ solid
  • Motor skills: develop fine motor skills by pinching, squeezing, rolling, squashing, flattening
  • Creativity: pretend and role play scenarios eg bakery, sweet shop, pizzas, pancakes. Using one tool to represent another in imaginary play. 
  • Knowledge & Understanding (Science): Mixing ingredients together, observing change of state of materials, predicting outcomes, experimenting outcomes of adding more flour/water, talking about real cooking ingredients and tools, baking and experimenting with recipes and outcomes
  • Maths: counting out cup fulls, measuring and quantities, capacity- full, empty and half full
Cakie: 4.3
Pop: 2.9 
Bean: 10 mos

Top 10 Baby Play Ideas from 2012

$
0
0
As another year ends I always find it fun to go back and see which posts were the most popular with you all and round them up to feature them by theme. Here are the top 10 posts relating to baby and young toddler play from this year.
Most are about hands on, sensory activities as well as some ideas for creating stimulating baby play areas and a list of our most favourite and tried and tested toys. Enjoy a little reminder of your favourites or discover them for the first time if you missed them earlier!

Baby Sensory Bottles

Baby Sensory Play: Bubbles


Baby Sensory Play: Coloured Water


Baby Sensory Play: Raspberry Spaghetti


Fibre Optic Sensory Cave


Baby Hand and Foot Prints from Salt Dough


Travel Size Baby Treasure Basket

Reggio Inspired Baby Play Space for  0-6 months

Reggio and Montessori Baby Play Space for 6-18 months


Top Toy List for Babies and Toddlers


 More Top 10 Collections are coming soon!

May I take this opportunity to say a huge THANK YOU for continuing for read The Imagination Tree this year. I am so encouraged by your comments, emails and interaction on the blog and over at our thriving Facebook community and without you all I wouldn't be writing here!


Get play ideas sent straight to your inbox!
Enter your email address:
Delivered by FeedBurner

A Play Pledge for 2013!

$
0
0
Here is our fun and playful approach to our new year's resolutions this coming year! A play manifesto filled with easy, low effort and no-cost inspiration for getting into play and letting go of being perfect and getting it all right. 
We can't do it all in the busy lives we lead, but if we take time to slow down, enjoy the little things and relish each moment then they will add up to a rich and memorable bigger picture. And these moments and memories we create with our families are far more wonderful than which classes they sign up to, where we go on holiday or what toys they have. 


Feel free to right click and save this picture to print out at home! Or pin it for future reference too.


Project Organize Your Entire Life eBook!
And in the spirit of making new commitments and plans for the coming year, I'm thrilled to tell you about this wonderful eBook from my very talented friend Stephanie, at Modern Parents Messy Kids. I can't tell you how much I need this help in my life this year! She approaches decluttering, list making and home organisation in a realistic, achievable and fun way, as well as offering a large community to be a part of as a means of mutual support and encouragement. Just perfect! I have downloaded it and hope you will too so that we can try and tackles the clutter and chaos together this year!

Here is more about the book in Stephanie's own words:


  • Step-by-Step action plans for conquering some of the biggest obstacles to living the simplified life: decluttering, cleaning, organizing, meal planning and more.
  • Customizable strategies for it all. We’re of the belief that one size does NOT fit all. Which is why the quick start guide is full of resources for a variety of lifestyles, schedules, and personalities.
  • A built-in support network.  Yeah, we know, a support system for organizing? Sounds a little over the top – but you’d be surprised how motivating a facebook group of over 4,000 fellow simplifiers can be.
  • No unattainable goals, only real-life expectations.  If there’s one thing we’ve learned, it’s that simplifying and organizing is a journey, not a destination.  So we’ve set up our quick start guide accordingly.  By offering lots of different strategies for tackling a problem, we’re arming you with the tools you need to be successful when life changes on you.
  • Bonus Material: We’re also teamed up with our favorite meal planning service to offer everyone who buys the eBook an exclusive 20% discount code – it’ll make dinner prep a snap!
Click here to get your copy today!

Happy 2013 everyone, thank you SO much for your continued readership and love this year. I am so grateful for each and every one of you!

DIY Light Box for Sensory Play

$
0
0
Create a homemade light table for sensory play and investigation with kids, using simple and affordable items from around the home!
 
About a year ago light tables or boxes suddenly took the kids' activities online world by storm! I was enamoured by them as I had desperately wanted one in my Reception classroom but at over £200 it never materialised, so I just admired from a distance! Then the very clever Deborah from Teach Preschool experimented with making her own using push lights in a tub and the lovely Jackie from Happy Hooligans used a circle light to make her own.  Not having those special types of light, but still inspired by them, I decided to try out finally making my own using the Christmas lights that we have just taken down off the tree. I was doubtful about how well it would work with such soft lights, but the results are wonderful and we are all  hooked!
A traditional light box is used with children to explore objects with the added dimension of upward facing light, and can be brilliant for investigating silhouettes, colour mixing, x-rays and patterns, amongst many other things. 

To make our light box I used:
a large, opaque, underbed storage tub from Ikea
2 strings of Christmas lights
large sheets of tracing paper and sticky tape

To assemble:
Line the inside of the box lid with sheets of tracing paper and stick down with sticky tape. This will dull the light and help it to be dispersed more evenly.
Put the Christmas lights into the box and spread them out evenly. I let the leads com out at one corner and the lid still fit over the top without a problem. If that doesn't work for you then simply make a small hole in the corner of the box and thread the leads through. I want to be able to use this box for more sensory play in the future so need it to remain leak-proof!
Put the lid on, turn the lights on, turn off the lights in the room and PLAY!!
 Baby crawled over and climbed straight on top of the box, where she remained all afternoon until bedtime (give or take having her dinner and bath!) She was totally mesmerised by the light and loved being able to play at such a convenient height. Because of the size of the box, all three of them were able to play at the same time with enough room each, which is a huge bonus for us.
 We added the gorgeous liquid colour blocks that they got for Christmas and this was the perfect way to explore them. When stacked together new colours can be made and the big girls had fun predicting which ones would combine to form which new colour.
Colour Water Blocks


 Then I remembered the lovely coloured bingo chips that we have in our cupboard full of bits and pieces, and they looked gorgeous against the light. Cakie and Pop counted them, lined them up, made patterns, scooped them into cups and layered them up.
 Baby loved these too, and under close supervision not to eat any, she was able to use a pincer grasp to pick them up and drop them into clear plastic cups and on top of the liquid blocks. She returned to that activity all afternoon and seemed to love the sound they made as they fell!
 At one point we had trapped a low branch from the Christmas tree under the box lid by mistake, and Cakie pointed out that it was making a silhouette (we've been looking at Winter tree silhouettes this week in nature!) I grabbed some left over tracing paper and suggested she used it to trace the outline.
 She loved this new drawing activity and I think there are many exciting new things we could try together using this method. Some crafters and tattoo artists use light boxes for very similar purposes.
After we have finished the initial burst of play with our new toy, I will pack the lights into a bag and store them inside the box ready for another day. There are hundreds of possibilities for light box play and learning ideas and it is suitable for all ages, from babies to much older children.

What they are learning as they play:
sensory:investigating materials using all the senses
science: understanding silhouettes, shadows, light, colour mixing
maths: counting, sorting, pattern making, filling and emptying
motor skills: developing hand-eye coordination, pincer grasp, scooping, pouring, tipping, moving, stacking, balancing

Lego Print Thank You Cards for Kids

$
0
0
Use Lego and Duplo blocks to create beautiful prints to decorate thank you and birthday cards! Simple,  easily achievable for little hands and very effective in bright colours, this is one of our favourite go-to art activities!
After each Christmas and birthday I always have good intentions for the kids to make their own thank you cards to send to friends and relatives, but often the task seems to big and gets abandoned mid-way through. This time we centred the task around a fun and creative art activity of printing in bright paints using Duplo Lego blocks, creating mini-masterpieces to give away as their thank yous.
 
Printing with Lego and Duplo blocks is lots of fun and also a great idea for younger children as the blocks are easy to grasp and don't slip when dipped in paint. The patterns that emerge are striking, especially when overlapped and dipped in multi-coloured paints and they can look gorgeous against contrasting colour background papers. We first experimented with this method of printing with our Eric Carle inspired art work and framed letters. 
 After they had printed with paints onto brightly coloured tissue papers, we left them to dry then snipped the sheets into random shapes. They then glued these directly onto the front of folded white card. Finished!
We also printed some Lego patterns straight onto the front of some mini-sized cards for some variety. These would look really striking in black on white or neon colours on black!
Have you made any cards yet? Please share a link!

What they are learning as they play:
creative: making prints, overlapping, colour mixing, cutting and tearing, creating collage
maths: recognising and naming circles, creating patterns, counting shapes, rotating and overlapping shapes
motor skills: grasping and careful printing with blocks, hand:eye coordination, cutting with scissors, tearing using two hands, sticking

Cakie: 4.4
Pop: 2.9
Bean: 10 mos

More Printing Ideas!
Eric Carle Style Art
Van Gogh Style Fingerprint Paintings
Muffin Tin Op Art Prints
Printing With Peppers
Circle Printing
Wellie Boot Printing
Bubble Wrap Printing
and lots more!

Play Dough Inventor's Workshop

$
0
0
Use old electrical cables, loose parts and recycled junk materials to create an imaginary play inventor's workshop, using play dough as a base material to build and secure. This activity is fantastic for providing open-ended creative play, hands-on investigations, designing and planning, story telling and scientific discoveries! Best of all, as with all great kids activities, it doesn't cost anything to set up. Win, win!
 Before Christmas Cakie watched a movie called Meet the Robinsons, in which the central character is an inventor. She was totally fascinated by the amazing machines that he drew in his sketchbooks and how he created them from wires and bits and pieces. She started to make her own "inventions" using loose parts that she could find and she dug into our large drawer of odds and ends that included some old tv leads with various coloured ends. She loved these and declared she wanted to design her own "sweetie machine like Willy Wonka!"
She sat at her desk and drew a large plan of what she wanted the machine to look like (I will try and dig out this drawing to add to the post- it's lovely!), with arrows pointing to various buttons and places that sweets go in and pop out again. I set up an invitation to play on a table top using the following elements:

old tv cables
colloured buttons
bottle tops
jar lids
coloured wool and string
pipe cleaners
cardboard tubes (wrapped in shiny tape, leftover from her Willy Wonka birthday party)

As with all play invitations, I showed them what I had set up and left them to use the materials in any way that appealed to them. Two year old Pop joined her, using her own ball of green play dough, and together they began to build and connect the pieces, using the dough as a stabilising base.
 
Cakie spent a long time connecting the wires, string and pipe cleaners and making sure that the ends were poked into the holes in the bottle tops and buttons. She ran her fingers along each part, checking they were secured and rearranging them if parts came out or didn't 'seem to fit quite right. She narrated what she was doing as she played, using words like "invention" and "machines", "wires" and "switches" as she figured out her design. She demonstrated to me how to drop ingredients down the pipes, then how the sweets were mixed and made in the tubes and finally where they were dropped out at the end, via a large button! I love the thought processes and design and making skills that were being practised in her play.
 Pop watched her big sister and made her own version suitable to her own stage of development. She squeezed the dough into pieces and pushed in large buttons and jar lids, pipe cleaners and wool, enjoying the sensory and malleable elements of play. She declared "I making sweeties!"
This would make a fun addition to the science and investigation area in the classroom to go along with books or topics about machines, inventors, construction or factories. See below for more ideas.

What they are learning while they play:

Increase the learning opportunities:
  • Add some machine manuals and instruction booklets to provide a context of real-life literacy examples.
  • Add clipboards, pencils, drawing pens, strain, rulers and protractors so they can plot out their designs properly. 
  • Supply children's digital cameras so they can photograph the step-by-step process of the machine production line
  • Watch a clip of designers and inventors and talk about the tools they use, the materials the parts are made of and what they may be creating.
  • Read aloud the section from "Charlie and the Chocolate Factory" (Roald Dahl) about entering the Invention Room. Ask the children to listen out for descriptions of the machines and to think up their own sweets, toys or other products that could be created in a machine.
  • Make a large scale machine from junk model materials based on their designs.
Read these books along with this play:
The Dragon Machine
Curious George Goes to a Chocolate Factory
Cakie: 4.4
Pop: 2.9

The A-Z of Play Dough Recipes and Activities!

$
0
0
Here's the ultimate collection of more than 50 play dough recipes and creative play activities to take you from A to Z! 
We absolutely ADORE play dough and challenge you to have a go at making your own, try a new flavour or use it in a different way this coming year! We play with it so often that I'm not even surprised to say that all of these recipes are found here on this site! Some ideas are illustrated by photos rather than links to posts and these are of Invitations to Play  set ups that we have shared this year on our  Facebook page . There are also references to cloud dough, salt dough, snow dough and clay dough for you to try out too!

A is for Aromatherapy play dough
 ABC Play dough


B is for Blueberry play dough
 Bakery play dough


C is for Cinnamon play dough cookies
 Chocolate Play dough
 Cupcakes and Candles

 Cloud Dough

D is for Dinosaur play dough (see photo below)

E is for Early Learning Skills Play Dough Maths


F is for FAIRY play dough
Florist's Shop Play dough
Fossil Imprints in Salt Dough


G is for Gruffalo play dough

Gingerbread play dough
Golden Shimmer dough
Gluten Free play dough

H is for HERBAL play dough
Handprints and Footprints in salt dough

I is for INVENTOR'S play dough

Initials Salt Dough

J is for Jubilee patriotic play dough cupcakes (see photo below)

K is for Kinaesthetic and educational benefits of playing with dough

L is for Lavender play dough


M is for Monster play dough

 Maths play dough
Mermaid Lagoon Cloud Dough

N is for Natural play dough

Nature Impressions in play dough

O is for Ornament Dough
Oranges and Lemons play dough (see photo below)


P is for Peanut Butter play dough
Pirate Play dough (see photo below)

Pizza Play Dough
Pattern Making with play dough (see photo below)

Pinkalicious Cloud Dough Cupcakes

Q is for Quickest ever 4 minute play dough recipe!


R is for Rainbow play dough
Roadway Play Dough (see photo below)

S is for Sweet Shop play dough

Strawberry sparkle play dough
Sand play dough
Snow Dough

Salt Dough Ornaments

T is for Three Bears Porridge Oats play dough

U is for Under the Sea play dough (see photo below)


V is for Very Hungry Caterpillar play dough

Valentine's Chocolate Box play dough


W is for Wholegrain play dough
 Willy Wonka play dough
 White Snow play dough


X is for eXploration kit for using in play dough (see more ideas in this benefits of play dough post too)

Y is for Yellow colour sorting play dough (see photo below)

Z is for Zoom! Black sparkle space play dough


Inspired by these ideas? Get ready to be AMAZED by the sheer number of incredible posts linked up in this huge ABCs series, from over 100 bloggers from around the world. Here is a link to the other participants in the Learning Through Play category, and there are dozens more too! Each one of these is a complete A-Z list of ideas per topic:


Join over 24,000 others on our Facebook page for daily play ideas and lots of early years play conversation!


Want to receive all our play ideas  directly to your inbox? 

Enter your email address:

Delivered by FeedBurner

Snow and Ice Play Ideas for Kids! [It's Playtime!]

$
0
0
Here are 8 creative ideas for playing and learning with ice and snow! Welcome to the first It's Playtime of the new year and please come and link up your own blog posts below so that we can feature you in future weeks.


[Clockwise]

Arctic Small World Play in a Suitcase [The Imagination Tree]

Snow Dough Sensory Play Material [The Imagination Tree]

Frost Writing [Making Boys Men]

Snow Spray Painting [Mama Papa Bubba]

Melted Snowman Sensory Play [Adventures at Home with Mum]

Reddi Whip Snow and Trucks [Creatively Blooming]


It's Playtime is a collaborative kids activity linky hosted by:

By linking up you are giving us permission to feature one photo with a clear link back to your post.

DIY Milk Jug Scooter and Bike Lanterns!

$
0
0
Make some DIY milk jug lanterns for attaching to the front of scooters and bikes, for fun adventures in the dark! So much fun on dark winter afternoons and a prompt to get outside and exercise even when it seems so miserable (hello UK weather, I'm talking to you!)
Our girls adore their scooters and are always whizzing on them when we go out for a walk! With these dark afternoons starting so early and making the day seem so short, I thought it would be fun to add an exciting new element to the front of the scooters for some night time riding! 

Materials Needed:
empty milk jugs, washed and dried
colouring pens
scissors
battery operated LED lights OR glow sticks
First of all I cut a small section out of each handle so that it could hook over the handlebar of the scooter. I tried these on their balance bike handles and they fit over those too, so I am sure you could adapt the cutting in any way you need to fit whichever style handlebars you may have.
Then I simply offered the girls lots of ordinary felt tip marker pens to draw and decorate their lanterns with. It would be better to use permanent pens like Sharpie markers, so that the colours can't rub off, but I didn't have any (shock horror!) These pens stayed on the plastic fine and didn't rub off if left to dry before being touched.

Then I cut a small hole at the back (see arrow in picture) and pushed in a small push button LED light into each jug. I had intended to use glowsticks in these lanterns and I've no doubt it would work very well, but on activating them one split and the liquid shot into my eye! Ouch. Suffice to say, I decided to bin the lot and stay on the safer side with the LED lights. These battery operated lights were so bright and powerful and made the colourful jugs glow beautifully. The girls were thrilled!

Next step was to get out and road test them in the dark! They whoosed up and down the pavements around our neighbourhood and lots of passers by turned to take a closer look. Cakie said "we are just like the cars with our headlamps on now!" 
Using the lights has actually worked out as a better solution as we can keep the lanterns for longer and use the scooters every day for a pre-dinner adventure each night!

What they are learning as they play:
creativity designing and crewing in 3D, using a range of materials, model making
science designing and making a project from start to end, testing, experimenting, lights and shadows, simple technology, on and off switches
language learning new vocabulary e.g. "modify" and "design"

Cakie: 4.4
Pop: 2.9
Bean: 10 mos

Have you ever made a lantern or nightlight? What materials did you use?

You can also use milk jugs to make:

Baby Dropping and Posting Game
Tube, tape and beans Discovery Box
Easy Catching Game

Join over 24,000 others on our Facebook page for daily play ideas and lots of early years play conversation!


Want to receive all our play ideas  directly to your inbox?  

Enter your email address:

Delivered by FeedBurner

Spin Art Heart Cards for Valentines Day

$
0
0
Make some gorgeous Valentine's day heart cards using spin art with bright and sparkly paints!
We used our favourite method of salad spinner painting to create these beautiful hearts on bright red card, ready for making cards and a garland for Valentine's Day (or any day that needs a bit of love!)
This time we used just multi-coloured glitter glue, an no paint, for a really sparkly effect. After spinning once they added some  more on top and spun again to create layers of colours.
 
Once they were dry we stuck some onto the front of plain white folded card. The bright red with the sparkly colours look so striking on the contrasting white background. Then they wrote inside who they will be for.  Cakie's is for Daddy, of course!
I stuck the rest of the hearts onto a ribbon, using tape at the back, to make a garland decoration. They're adding a little sparkle and colour after the plainness of the post-Christmas decorations!

See our other spin art creations:

Cakie: 4.4
Pop 2.10
Bean 10 mos

Join over 24,000 others on our Facebook page for daily play ideas and lots of early years play conversation!


Want to receive all our play ideas  directly to your inbox?  

Enter your email address:

Delivered by FeedBurner


Giacometti Inspired Figure Sculptures

$
0
0
Create some beautiful sculptural figure art with kids based on the work of Alberto Giacometti! Simple to create yet so effective, an as a bonus it is a great way to teach about body structure and anatomy with young children.
I have long been a lover of Alberto Giacometti's iconic tall, thin figurative sculptures and have been lucky enough to have seen a few of them during my art history studies pre-teaching and pre-kids (aka when I was oh so much younger, sigh!) So it has long been on my wish list to try making our own version with the children, not out of his chosen material of bronze, of course, but simply using tin foil and tape.


Giacometti: Miniature Figures in bronze

We looked at Giacometti's sculptures in some of my art books and in online galleries and noticed that some were created on a tiny scale and others in larger than life size, so that you can actually walk around them and through them in a gallery setting. We decided to keep ours small enough to be able to use them like puppets for interactive play and storytelling.
Lady walking through a Giacometti exhibit


To begin we started rolling a wooden skewer in a piece of tin foil, to give a little structure and support to the figure. We left a couple of inches of foil at one end without the stick in it so that it could later be folded to create a head. Cakie was able to do this by herself and my role was just to give help with the tape and instructions where needed.

Next she folded over the top to create the base for a head, then we tore another couple of small pieces of foil and wrapped those around to bulk it up. Using 4 longer strips, she then folded them over to create the arms and legs. We looked at how Giacometti elongated the limbs and made them as long as possible. She turned out the feet and hands herself and then we simply stuck them to the torso using tape.

When she had finished the first one she immediately wanted to make another one so they could be friends! The second figure turned out to be a ballerina queen and she wanted to show her dancing and moving. This was a lovely opportunity to talk about how we move our limbs when dancing and Cakie showed me some of her ballet poses that she has learned and we were able to replicate those in her figure thanks to the parts being so flexible and easy to reposition! A great little lesson in anatomy and movement. I absolutely adore the resulting figure that she made!
I suggested sticking another skewer into the bottom part of the sculptures so that she cold hold and move them securely while playing, but these are not essential and don't add anything aesthetically to the overall look of the art work!
She then played with them and turned them into a king and queen who wanted to dance at a ball and fell in love with each other. I love the idea of interactive, story-telling art work SO much more than untouchable art behind a rope or glass in a gallery!
 And here they are lying side by side together.
 We also noticed how very similar in style these sculptures and Giacometti's are to this beautiful wooden sculpture in our home, from Zimbabwe in Africa! No doubt this type of art was a key influence to his own artistic development when he was alive.
Today's post is the latest in our series of Kids Get Arty! This children's art celebration is hosted by Red Ted Art, Tinkerlab, Imagination Soup, Mom to 2 Posh Lil Divas and Creative With Kids. We each look at a different artist and find creative ways to interpret their art and techniques with our own children. 
More Art Posts you may enjoy:

Cakie: 4.4
Pop: 2.9
Bean 10 mos

Please check out what my co-hosts are featuring today too and then link up any posts YOU may have relating purely to kids art. Thank you!

Incy Wincy Itsy Bitsy Spider Activities and Resources

$
0
0
A collection of Incy Wincy (Itsy Bitsy) Spider activities and resources to encourage creativity, counting and literacy development for young children!

I'm excited to begin a new series about singing, rhymes and music, starting with some popular nursery rhymes and counting songs over the next few weeks. Where possible I will be linking to one of my new favourite online resources, Twinkl, an educational resources site, who have partnered with me to create some bespoke materials that you can download and use at home!

Each post will be a quick round up of some favourite ways to play and learn about each topic, with links to resources included.

Play Dough Incy Wincy Invitaion to Play:
I set out black sparkly play dough, pipe cleaners, googly eyes and a book with a spider poem (Mad about Minibeasts) to inspire some spider creations! The forks were for encouraging them to add texture and patterns to the dough.

This activity encourages creativity, fine motor and malleable skills, one to one correspondence and counting skills.

Handprint Spider Puppets
We made handprints in black paint and then overlapped them and stuck them together to create spider shapes. On top we added googly eyes and then attached them to bamboo skewers with tape, and turned them into super simple stick puppets!

These are great for storytelling, acting out the main parts of the song, using as a counting stick to jump along a number line. You can print some numbers on spiders here and sit them out to create your own number line for the children to count along forwards and backwards.

Incy Wincy Interactive Songsheet 
This is a fun way to bring a song to life and to create a lasting resource for home or classroom using kids' artwork as the main decoration. Using some velcro to create detachable pieces makes it interactive and prompts involvement from the child at the right part of the song. You could create a whole book of favourite songs and rhymes this way!
This activity is great for promoting listening and concentration skills,  and learning rhymes by memory.
Fine Motor Threading Activity [from Rainy Day Mum]
This activity is perfect for developing pre-writing skills by strengthening hand muscles and hand-eye coordination! Click through to find the full details of how to create a paper plate spiderweb.
Storytelling and sequencing
Using the fabulous resources on Twinkl the girls coloured some song sheets and were able to then put them in sequential order, singing through the song as they placed each one in the right place.

We were able to turn the other printable (a full colour version of the song sheets) into a song book that they use to sing through together. Very sweet!
These are great for story sequencing, retelling in the correct order, singing and learning rhymes. The pictures would be great for turning into little books as well, which the children could annotate.

Counting Number Line and Spider Stick Puppets
This fantastic Counting Activity Resource Pack from Twinkl has been created specially in conjunction with The Imagination Tree, after I asked if they could be done! These are free to download (click the link to be taken to their direct link) and are brilliant for using in nursery, homeschool or the classroom. You could simply print the number spiders and use them around the room in order, or give them to the kids to play with, playing ordering games or making number lines on a piece of washing line. There are lovely plain spiders in the kit too for doing whatever you like with, and these are prefect for turning into stick puppets (especially if you don't have the time to make the handprint version I shared above.)

Print these alphabet spiders off, cut and laminate to make flashcards, a letter frieze or an alphabet book together. You could print just the letters in your child's name even!
For slightly older children you could create a large web on the wall or across a corner of the room using cotton thread, then dangle these high frequency word spiders from it as a fun and striking way to have them on permanent display. Words that children see in their environment are often learnt the fastest by memory.


Check back for an upcoming activity resource post about 5 Little Men in a Flying Saucer and Space play ideas! 


Like bugs? 

Join over 24,000 others on our Facebook page for daily play ideas and lots of early years play conversation!


Want to receive all our play ideas  directly to your inbox?  

Enter your email address:

Delivered by FeedBurner

Edible Jewels Sensory Play!

$
0
0
Today's super sensory playful activity comes to us via a wonderful guest post by Rachel of Kids Activities Blog.

This is a super simple kids activity that will keep your kids engaged for hours - playing and eating jewels - aka pomegranate seeds. One of our winter activities is picking out the seeds in our favorite seedy fruit!

To add an educational element to our snack preparation, as we broke open the pods we looked at the seeds with magnifying glasses, it was fun to find the "embryo" in the seeds. We talked about how the pulp was the plant "food" and if we planted the pomegranate, the pulp of the pod would help give the seeds nourishment as they germinated and grow.   The absolute highlight of the afternoon was watching the kids separate the seeds from the pulp. I am sure there are quicker ways to enjoy a snack, but none that are "as pretty". The girls *loved* the squishy textures!  

Our Pomegranate-Veggie Juice Recipe:

Press the seeds that you harvested from the pods to collect the juice. We used a potato masher and then strained the seeds out of the juice. Add it to a blender with a handful of spinach and a handful of frozen blueberries - and apple juice. Yum! A fun way to eat veggies!
     Playing with food:
    Are you looking for more ways that your kids can enjoy their food?? Here are some of our favorites:
     Rachel is a busy homeschool Mom of 6 and writes along with Holly and the other Quirky Mommas over at the fabulous Kids Activities Blog. Visit today to be inspired with lots of ideas for activities from babies to school age!

    Red and White Clay Heart Ornaments

    $
    0
    0
    Make some beautiful heart ornaments from homemade red and white clay, ready for Valentine's day or as a lovely gift or decoration for a loved one!
    homemade clay heart ornaments for valentine's day craft
    Before Christmas we made some beautiful sparkly reindeer ornaments using homemade white clay mixed with glitter. They were surprisingly easy to make and the recipe was very inexpensive, using just a few ingredients from the kitchen cupboards. So we made some more clay to have  go at making some hearts for Valentine's day! This time I wanted to experiment with colouring the dough during the cooking stage and it worked really well. You could be really creative with this and try any combinations of colours and glitter to see what lovely effect you could make.
    Recipe

    1 cup bicarbonate of soda (baking soda)
    1/2 cup corn flour (corn starch)

    3/4 cup of warm water
    red food colouring

    To make the two separate colours I halved the ingredients first, then did the following steps twice. First I made the white dough, then I popped the next set of ingredients in the pan and made the coloured dough. 

    Mix the dry ingredients in a pan then stir through the warm water. If you are adding colour, now is the time to do that. Otherwise skip this next step and read on.

    Add red food colouring (either half a bottle of liquid or a teaspoon of gel colouring) then mix over a medium heat, stirring as it starts to bubble and come away from the sides of the pan. 
    When it has started to dry and resemble a soft play dough consistency, take it off the heat and leave it to cool for a few minutes. 

    Turn it out onto the counter and knead it for a couple of minutes to make it super soft and pliable. It should resemble play dough and be easy to roll out and work with.

    When the doughs were cool enough we rolled them out and used different sized heart cookie cutters to make some heart shapes. To make the outline heart we cut an insert heart out of a large heart, using a smaller cutter. Those turned out particularly delicately and pretty!

    Using the white dough for contrast we added spots. stripes, smaller hearts as inserts and I made a set of initials so that each child could have one to represent her own name. The doughs just stuck together without any need for glue, but you do need to work quickly as this type of dough dries quite fast and can become crumbly at the edges or crack slightly.

    If you want to hang them you will need to poke through a straw at the top before letting them harden.

    When finished we put them on a being tray and into the oven for one hour at 100 degrees C (200 F) but they also air dry perfectly without the need for heating. If you have a particularly hot oven you may find it better to turn the oven onto the said temperature, then switch off when you put the ornaments in for the hour. If you try either of those alternatives please tell me how long it takes for them to harden! Thanks!

    When cool they can be coated in mod podge or varnish and hung up by threading ribbon through the holes.

    Here's what they are learning while they play:

    motor skills: mixing, kneading, rolling, cutting, squeezing the dough; threading the twine; hanging carefully by the loops
    maths: measuring quantities
    science: observing change in state of materials from dry to malleable to hard
    literacy: following instructions, reading recipes

    Cakie: 4.4
    Pop: 2.10
    Bean: 11 mos

    See our other ornaments too!
    Handprint and Footprint Keepsakes
    Easy Salt Dough Ornaments
    Salt Dough Initials
    Sparkly Reindeer Ornaments from White Clay

      New here? Welcome!
       Sign up to receive every post in your inbox!
      Enter your email address:

      Delivered by FeedBurner

    Valentines's Day Heart Crafts and Activities for Kids

    $
    0
    0
    Here's a collection of simple, beautiful heart themed activities and crafts to do with kids, that are suitable for all ages from toddler to school age. Perfect for Valentine's day activities or as a special homemade gift for Mother's or Father's day later in the year.

    Valentine's day crafts and activities collection
    These heart crafts and activities cover lots of materials and genre, including printing, stamping, weaving, collage, clay modelling, cutting, sticking, greetings cards and play dough! Hopefully you will find at least one new idea to try at home, school or at a kids club from this list [all from this blog.] Enjoy!

    Spin Art Heart Cards


    White and Red Clay Heart Ornaments


    Potato Print Heart Cards


    Cookie Cutter Heart Prints


    Tissue Paper Stained Glass Hearts


    Woven Hearts Mobile


    Stuffed Heart Collage 


    Shaving Cream Marbled Hearts


    Strawberry Sparkle Playdough


    Heart Shaped Photo Holder


    Chocolate Playdough


    Do you celebrate Valentine's day with the children in your care? What ideas do YOU have to share with us? Thanks!

    Cakie: 4.4
    Pop: 2.11
    Bean: 11 months

    Alphabet Shells Playful Literacy Games

    $
    0
    0
    Create a beautiful, natural resource for teaching and learning the alphabet using real shells! These can be stored and used over again for many different early literacy learning objectives, from letter recognition to phonics, upper and lower case matching and spelling small words together! All in a hands on, fun and multi-sensory learning approach.

    Recently my wonderful sister in law gathered these beautiful white shells and posted them to me as she knows me well, and also that shells are harder to come by where we live. The girls love plain with natural objects and we have made natural discovery baskets and interest tables in the past. After playing with these in the sand and water for a while I thought we could make them into a permanent resource for our playful literacy activities!

    Using a Sharpie marker (permanent marker pen) I wrote one letter onto the inside of each shell, creating one set in upper case and a corresponding set in lower case. Then I simply placed them in a ceramic dish filled with leftover yellow dyed rice (from our Christmas cinnamon sensory tub here.) This was to add an element of sensory play and kinaesthetic learning. You could also simply place them in the sand box or in some coloured, scented sensory salt.
    After playing with the shells, scooping and pouring rice and pointing out some letters from their names, I suggested we play the match up game, finding the corresponding pairs of upper and lower case letters. With younger children it would be good to have an alphabet chart to hand so that they can use it to help them. Cakie was able to do this independently and loved finding the "Mummy letters and baby letters" and putting them in a line together.
    After that we played another game where we turned all the shells face down in the rice so that the letters were hidden. Then we took it in turns to turn one over at a time and to name the letter that was on the other side. They then placed that next to them on the floor (a bit like collecting Scrabble tiles) and after each turn we had a look to see if anyone had enough correct letters to be able to form a word yet. Pop had the letters "S" and then "O" and we read the word "so" together, sounding out each letter by pointing at it, then blending them together to form the little word.
    It took a while to get enough vowels each to spell some CVC words (Consonant Vowel Consonant), but Cakie was thrilled when she could write "mat" with her collected shell letters. And they both fell about laughing when I had enough letters to spell "bum"! Oh how eternally hilarious for young children! You could change this game by simply putting 3 shells together and asking your child to read the words created, or ask them to find particular letters to match the sound you are saying. The possibilities are endless!
    What they are learning while they play:
    literacy: letter recognition, matching upper and lower case letters, sounding out letters phonetically, forming 2 and 3 letter words (CV and CVC words), beginning to recognise small words independently, be able to sound out small words
    motor skills: fine motor skills in picking up and turning over small shells, playing with rice in handfuls and scoops
    social skills:turn taking, playing according to rules, sharing


    Cakie: 4.4
    Pop: 2.10
    Bean 11 mos


    Enjoy this post? You may like to check out all our previous ideas from the Playful Literacy series by clicking the image below. There will be a new Playful Literacy idea on the blog each week from now on too, so sign up to receive our emails and stay tuned in!

    Weighing and Measuring With Egg Cartons: Playful Maths

    $
    0
    0
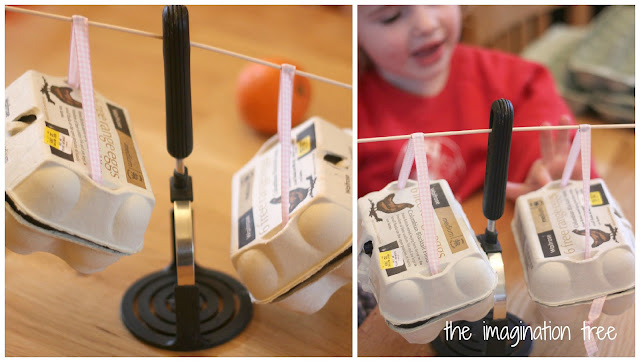
    Recycle old egg cartons for use in playful maths investigations, using them to create some weighing scales and a non-standard unit for measuring objects with! 
    Welcome to a brand new early learning series being hosted on The Imagination Tree and Learn With Play at Home each week, about Playful Maths ideas! We will be presenting fun, hands on and creative ways to make learning maths concepts exciting for young children from toddlers through to school age. 
    Each week we will be showing you ideas for using the most ordinary of everyday materials as an exciting play prompt for learning, and this week we are starting with the humble egg carton! Over the next two weeks we will show lots of different ways that egg cartons can be used to cover lots of early maths learning objectives. I'm starting with measuring today and Learn With Play at Home has a brilliant way to teach number bonds to 10!
    Fisrt of all we made some simple weighing scales to demonstrate very visually how some objects are heavier or lighter than others. This was great for investigating in a very hands on, practical way together and the cartons worked well!

    Egg carton weighing scales

    You will need:
    2 egg boxes, the same size and weight
    two equal length pieces of ribbon or string
    1 potato masher with a hole in the handle (or anything you can find that will serve as the central support)
    1 bamboo BBQ skewer (or similar thin stick)
    blu-tac (fixative wall tac)

    How to make the scales:

    1. Push two holes into each egg carton lid. They need to be in the exact same position for the boxes to hang equally (so I chose an actual indent in the lids so I knew it would be the same.)

    2. Thread through the ribbons and tie knots on the underside to stop them slipping through. Make sure the ribbons are still the same length! I had to readjust mine a couple of times to make sure.
    3. Push the skewer through the hole in the kitchen implement (or whatever you have found to stand in the middle.) I added a little bit of blu-tac to keep it secure in the middle. Measure an equal distance from the middle on both sides and mark it with a dot. Then put a little blu-tac on each dot and hang the boxes over that spot to keep them an exact distance apart. 

    All done and ready to get weighing!
    To test our weighing scales we found some small objects that would fit inside the boxes with the lids down. This was a great maths challenge in itself as they had to measure with their eye and figure out what may work.

    First we compared a small apple and a clementine. I asked the girls to predict which they thought would be heavier and how would the scales would tell us that. Cakie guessed the clementine because that was the one she had chosen to add, not for any mathematical reasons! She rightly said that the heavier item would make the scales tip and the box would go down. The apple was the heaviest!
    Next we tried two very similar sized toy trains and that was very hard to predict, but the train with the extra wheels was the heaviest and the boxes tipped accordingly. Then we tried weighing very light items and again, this was a great maths challenge to ask them to find very lightweight and small items to compare. We found some cotton wool balls and some small Lego Duplo blocks and the Lego was the heaviest, but not by much! This time Cakie had predicted correctly before hand.

    Another good challenge is to ask your child to predict what items might be perfectly balanced, by first holding them in their hands at the same time, at arms length to feel their weight for themselves. It can be a lot more of a challenge to find perfectly equal weight items than one heavier and one lighter.
     Egg Carton Measuring
    Next we had a go at using egg cartons to form a non-standard unit of measurement. This is always a fun activity with young children as it takes the pressure off being able to read real numbers and introduces the concepts of measurement in a very kinaesthetic and practical way. It can also be extended in any way that you like to become an open-ended challenge for older children too.

    Using some identical, 12 hole egg cartons, I first cut them into two long strips of 6 each. Then I cut those in half sideways to become 4 pieces, each with 3 holes in. This became our new unit of measurement and we called it The Eggy (after all, you can call your units anything you choose, right?!) With a huge pile of identical sized "Eggys"to work with, we were ready to get measuring!

    I drew a very basic little measuring chart with some various items from around the house, ranging in length from a tiny apple to a great big nearly 3 year old sister! Cakie used this to go around and find which item to measure next, and then wrote the corresponding length of each item next to its picture.
     We had a lot of fun together finding the items to measure and seeing which was the biggest and smallest and which turned out to be identical lengths. We talked about making sure the Eggy boxes were layed carefully in a straight line next to each object and that they touched end to end. There were a couple of instances where the object was slightly too long or too short and so we had to think of a solution. We talked about creating a half sized unit of measurement "The Half Eggy", and simply cut one box down to be just 1.5 holes long. This proved particularly useful for measuring the apple, as it turned out to be exactly one half Eggy long! And Cakie wanted to be measured too, as well as Pop, and  was found to be 7.5 Eggys long, where Pop had been 7! Who knew they were so close in size? Their Mum certainly hadn't realised!
    After she had filled in the chart with all the numbers we looked at it and talked about which was the longest and shortest by seeing which had the biggest and smallest numbers. Then we talked about which items were exactly the same length, which turned out to be the boot, the book and the teddy bear. It is a really good idea not to skip this stage as being able to draw conclusions from the experiment they have done is a crucial part of the learning, and also helps to consolidate that written numbers equate to the very real experience they have just had.

    Extend this activity:

    • ask them to draw or write a list of their own chosen objects to measure
    • can they find something that is 30 Eggys long? 50? More?
    • find out how tall objects are, instead of how long, by using whole closed egg boxes and stacking with them (see this post where we did something similar)
    What they are learning while they play:
    Maths: measuring using non-standard units, comparing quantities, comparing weights, comparing lengths, talking about more and less, longer and shorter, heavier and lighter, finding equal weights and understanding balance and "the same as", making predictions, testing, evaluating and re-testing
    Creativity and design: making models and working scales from junk materials
    Motor Skills: threading, filling and emptying, balancing


    Don't forget to check back next Friday on both of our sites to see what other maths games and concepts we will be posting about, using more egg cartons! Get collecting some cardboard tubes in the meantime, for upcoming weeks.
    See more egg carton ideas!
    Egg Carton Colour Sorting
    Egg Carton Counting and Sorting
    Egg Carton Toddler Discovery Box
    Egg Carton Printing


    Never miss a play idea again! Sign up to have all posts delivered straight to your inbox.

    Enter your email address:

    Delivered by FeedBurner
    Join us on The Imagination Tree facebook page for daily play ideas and conversation with the early years community!
    Viewing all 168 articles
    Browse latest View live


    Latest Images